After a night at Mongkutoromo I start trekking during the morning all the way to the peak of Mount Arjuna. The whole journey takes about 8 hours of slow hike. Since i am hiking with backpack load, it's as slow as i can get. The trail has a less denser forest with thick grassland at the tree foots. It was filled with so many flowers till i have to stop so many times to enjoy the view and take "some" pictures. As i ascending near to the top, temperature were getting low. As far as i can remember it was less than 10 degree Celsius at the top with strong winds.
This is how to enable Samsung Galaxy Note 4 to force use only 4G (LTE) network connection for high speed internet data. There is a built-in switch in the smartphone that will enable the smartphone to force use only either 3G (WCDMA) or 2G (GSM) network connection but, there is no switch at all to enable the smartphone to force use only 4G (LTE) network connection. Video Tutorial This is screen video record to show you how to do it. If you prefer screenshots, please skip this video and scroll after the video. Screenshots Tutorial If you are clueless about the existing settings that enable you to switch network mode, goto “Settings > More networks > Mobile networks > Network mode”. Steps: Step 1 : From the phone dialer, dial *#2263# and the smartphone will bring you into the “Service Mode” screen like below. Step 2 : Select “[4] LTE BAND PART1 []” and the smartphone will bring you into a screen to select the types of LTE mode. Step 3 : Select “[1] LTE ALL []” to force the smartp...
This city codes are provided in the watch user manual but for the ease of references in the web, I put this table in this blog in case i wanted to refer to it using my smartphone. Hope you find this useful. Code City UTC/GMT offset (hours) WLG Wellington 12 NOU Noumea 11 GUM Guam 10 SYD Sydney 10 ADL Adelaide 9.5 SEL Seoul 9 TYO Tokyo 9 KUL Kuala Lumpur 8 HKG Hong Kong 8 SIN Singapore 8 BJS Beijing 8 PER Perth 8 TPE Taipei 8 BKK Bangkok 7 RGN Yangon 6.5 DAC Dhaka 6 KTM Kathmandu 5.75 DEL Delhi 5.5 KHI Karachi 5 KBL Kabul 4.5 DXB Dubai 4 THR Tehran 3.5 JED Jeddah 3 DOH Doha, Qatar 3 MOW Moscow 3 BGW Baghdad 3 HEL Helsinki 2 ATH Athens 2 ANK Ankara 2 ...
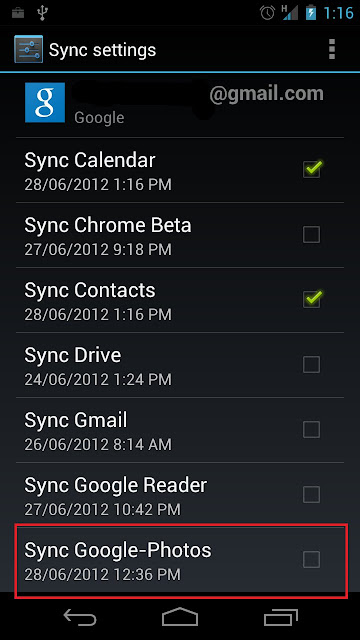
When i got my Samsung Galaxy Nexus, the first thing i did was to add my Google account into the Android OS and synchronized all my Google data such as contacts and Gmail. Little did i know that the Android OS also sync all my Picasa Web Albums photos into the photo gallery application. I don't need the photos from my Picasa Web albums to be in my Galaxy Nexus so i need to delete the synced photos. This is how to do it: Goto Settings > Accounts & Sync > {your Google account} Disable "Sync Google-Photos" setting. Goto Settings > Apps > All (tab) > Gallery Tab "Clear data" button. You will get a warning message but don't worry just continue as its going to clear the synced data. Fig 1 : Disable Google photos sync Fig 2 : Access Gallery application info Fig 3 : Clear Gallery application data Now i have disable the sync of the photos and also clear or deletes the synced photos from my Galaxy Nexus photo gallery. INDEX PAGE


Comments
Post a Comment