Posts

Showing posts with the label Windows

How to rip DVDs to MKV or MP4 files

Image
This is how to rip a DVD movie and convert it to either MKV file or MP4 file with compressed video  and audio data (smaller file size). Personally I prefer to convert it to MKV format as I can embed the multiple channel of language audio and subtitles that are already available in the DVD itself. Software tools needed: MakeMKV Handbrake Operating System:  Windows Steps: Use MakeMKV to extract out the video, audio and subtitles data from the DVD to a mkv file. This extraction will take around 20 minutes to complete and expect that the file size of this file is the same as the DVD. This is because there is no compression of the video and audio data yet. Use Handbrake to convert the DVD extracted mkv file to either mp4 or maintain mkv file format with compressed video and audio data. Depends on the settings of Handbrake, it might took as long as 2 to 3 hours for conversion. Make sure that you choose the desired language audio channel to be in the converted file. Make sure that yo...
How to boot Asus EeePC 1005px from USB drive

Image
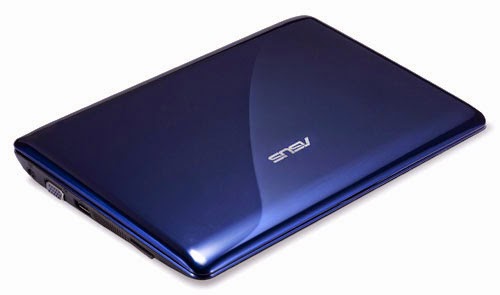
I keep forgetting how to boot my Asus EeePC 1005px from USB drive whenever I need to reinstall my Ubuntu Linux into the netbook. This is how to do it. During the BIOS boot-up screen, press ESC button and you will be presented with a boot device menu. Select the USB drive that you have already plugged in to your netbook and press enter. The boot device you selected is temporary and it's good for the purpose of reinstalling OS into the netbook. You don't have to change the boot order from the BIOS setup as the change is going to be permanent. By using the boot device selection menu, you can temporary set the boot device for that boot up only.

How to automate your CPU crypto currency mining whenever your Windows PC is idle

Image
This post is to show you how to use Windows scheduler and batch script to setup an automation to automate the mining of your favorite crypto currency (Bitcoin, Litecoin, Dodgecoin, etc…) whenever the Windows PC screen is locked, AC power plugged in and idle. The following steps are based on Pooler CPU miner program . You will also need to have a pool mining account. I assume that you already know how to setup the CPU miner to mine from a mining pool and you already know how to setup the JSON configuration file. Note: This post does not show you how to setup pool mining or creating an account for crypto currency. Prepare a start mining batch script 1. Create a start_cpuminer.bat script file and copy and paste the template code below: start /min /low [path-to-cpuminer-daemon-program] -c [path-to-json-cfg-file] 2. Replace the path to your Pooler CPU miner program and path to your JSON configuration file. Save the file after replacements. Prepare a stop mining batch script 1. You will nee...

How "Heartbleed" vulnerability works in a comic strip

Image
A simple and funny explanation on how the Heartbleed vulnerability works. via ( xkcd: Heartbleed Explanation )

How to run a command or application with a different CPU priority in Windows 7 using DOS command

Use the "start" command in command line to start a command or application with different CPU priority. start /[priority] [command or path to application] The priorities are: low normal high realtime abovenormal belownormal Example start /high [path-to-command/application]

How to install Adobe Flash plugin in to Tor Browser

Image
This is how you can install Adobe Flash plugin in to your Tor Browser. As Tor Browser is design for full anonymity browsing in the World Wide Web, Flash plugin will reveal your IP address to the server so it defeats the idea of anonymous browsing. But I found Tor Browser is a great way to by pass QOS filtering or throttling by ISPs when watching online videos and most online videos are still delivered using Flash. So having a Flash plugin in your Tor Browser is still useful. Warning If you are using Tor Browser Bundle is mission critical to you and you are trying hard not to get tracked, please do not install Flash. Doing so will jeopardise your identity in the network. This is how to install Adobe Flash plugin in to your Tor Browser Bundle. Update [24 June 2015] The new Tor Browser installation package already have the plugin installed with it. All you have to do now is to enable it. Windows 7 Copy all files in "C:\Windows\System32\Macromed\Flash" folder in to your Tor Brows...

How to turn your Windows 7 laptop or dekstop into a WiFi repeater or extender

Image
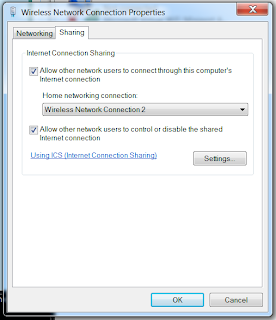
This is how you can create a WiFi repeater or extender access point (AP) using Microsoft Windows 7 operating system without using any 3rd party software. This is very useful when you are in an area where internet WiFi access point reception is weak for your mobile gadgets (smartphones or tablets) but not for your laptop or desktop. The WiFi adapters that are built-in your laptops or desktops are more powerful in reception quality compare to your mobile gadgets hence you could use your laptops or desktops as a WiFi repeater of extender for your mobile gadgets. Creating a Virtual WiFi Adapter access point (AP) Click “Start > All Programs > Accessories > (Right Mouse Click) Command Prompt > Run as administrator”.  Note: All commands in this post are to be run in administrator mode command prompt. Run the following command to create the AP: netsh wlan set hostednetwork mode=allow ssid=<your choice of wlan access point name> key=<your choice of access point password...

How to set Google Chrome custom proxy server settings independently from Internet Explorer proxy settings

Image
Google Chrome web browser by default uses the system wide proxy server settings. It does not have the user configurable settings to set it's own custom proxy server. That means whenever you change the proxy server settings in Chrome, you are actually changing the proxy settings for Internet Explorer too. To configure Google Chrome web browser a custom proxy server settings, this is what you need to do: Google Chrome program has a command switch "--proxy-server" where you can use it to assign a custom proxy server setting. Right click Google Chrome shortcut. Select "Properties". Append --proxy-server="proxy-server-IP:port-number" at the back of the Google Chrome command string in the "Target" box. If your proxy-server IP is "1.2.3.4" and the port number is "8080", then it should look like this: <path-to-chrome.exe>\chrome.exe --proxy-server="1.2.3.4:8080" . Save it and now the shortcut can be use to run Chr...

How to create seperators in Windows Vista Menu

A good piece of article about creating seperators in Windows Vista menu. The seperators can be use to organized your menu items. References, Sources and Credits: http://blog.syafril.com/?p=113

How to search "tab" in Ms Notepad or Wordpad

This is trivial but then it's useful at times as this is not documented anywhere. Enter a "tab" in Notepad or Wordpad, and selects it. Copy and paste it into your search box.

How to enable copy and paste between Windows machine and vncviewer viewing a Linux vnc session

Image
Ever wonder why you can't copy and paste from and to vncviewer that is viewing a vnc session from a Linux machine? It's likely that the vncconfig program is not running to handle your clipboard transfer. If you are seeing that you are unable to copy and paste from your vncviewer, run this command at the Linux machine command line window through your vncviewer that is viewing your Linux vnc session: vncconfig & If you want to run this command in the background without the little window with the settings appearing, use this command instead: vncconfig -nowin & Once vncconfig is running, close your vncviewer and reconnect it again. References or Credits: http://rreddy.blogspot.com/2009/07/vncviewer-clipboard-operations-like.html http://spuntamkar.blogspot.com/2007/01/copy-paste-between-linux-and-windows.html

How to run Sysinternals tools directly from the web

Image
Instead of downloading the whole Windows Sysinternals tools suite, you can actually access the sysinternals tools directly from the web. From your Windows command prompt, run: \\live.sysinternals.com\tools\<toolname> For a full list of tools that you can run, please refer to  http://live.sysinternals.com . References or Credits: http://technet.microsoft.com/en-US/sysinternals INDEX PAGE

How to create a large dummy file for testing purposes in Windows

Sometimes i just need a huge sized file to test Windows PC performance. Most often i would use any ISO image of a DVD. This command seems to make things easier for me to just simply generate a large file out of thin air! Run this command with your preferred file name and file size in your Windows command prompt: fsutil file createnew < file name > <size in bytes> INDEX PAGE

How to bypass the Windows "open with" using web service

Image
Whenever you double click on an unknown extensioned file where the extension is not currently registered to any program installed in your Windows OS, Windows will ask if you like to use the Web Service to find the right program to open your file or if you like directly choose the right program (that is already installed in the Windows OS) to open your file. I find this extra dialog box to be unnecessary to me and usually i would know which program to use to open up the "unknown" extensioned file. You can actually bypass this dialog box by a simple edit to your Windows registry. Steps: Open your regedit.exe program. Navigate to this folder: HKEY_LOCAL_MACHINE\SOFTWARE\Microsoft\Windows\CurrentVersion\Policies\Explorer Create a new DWORD  entry with value of 1 . Once you have created the DWORD entry with the proper value, you should get this dialog box directly asking which program to use to open an unknown extensioned file:

What is the difference between javaw.exe and java.exe ?

The javaw.exe command is identical to java.exe, except that with javaw.exe there is no associated console window. This implies you can't get it to display the version with -version, since there is no console to display it on. Use javaw.exe when you don't want a command prompt window to appear. The javaw.exe launcher will, however, display a dialog box with error information if a launch fails for some reason. INDEX PAGE

How to access GOD mode in Microsoft Windows 7

The following steps will guide you to create a special Control Panel that enables you to access all of the normal Windows 7 Control Panel without going through the levels of categorizations. All controls are displayed in one page for this Control Panel. Create a new folder anywhere. Rename the folder to: folder_name.{ED7BA470-8E54-465E-825C-99712043E01C} After you hit Enter, the last part will disappears and a new Control Panel will be created.

Drag and drop path to command prompt in Windows 7

In order to save time in typing the path of folders in command prompt, you can just drag and drop a folder from the Windows Explorer into the Command Prompt. You can even drag and drop a file into the Command Prompt to get the full path of the file with the filename. Elaboration

How to quickly start a new instance of a running program in Windows 7

A nifty feature in Microsoft Windows 7 operating system where you can start a duplicate instance of program from a running program. Hold Shift button on your keyboard. Left mouse click on any running program at the Task Bar. It will start a new instance of program.

How to access hidden themes in Microsoft Windows 7

There are hidden themes that are only available to certain regional countries and they are Australia, Canada, Great Britain, United States and South Africa. This post will guide you how to find these hidden themes and apply to your current Windows 7 theme. Start your Windows Explorer by pressing " Windows button " + E on your keyboard.  Click Organize from the top left corner of the Windows Explorer to drop down a menu.  Select Folder and Search Options and navigate to the View tab.  Select Show hidden files, folders and drives . Uncheck Hide protected operating system files (Recommended) .  Click Yes if prompted for confirmation.  Using your Windows Explorer, browse to C:\Windows\Globalization\MCT .  There are five folders with the name: MCT-AU (Australia) MCT-CA (Canada) MCT-GB (Great Britain) MCT-US (United States) MCT-ZA (South Africa)  Note that Australia, Canada and South Africa have the same themes.  Open the Theme folder inside...

How to eject Amazon Kindle Keyboard in Windows 7 for Charging Mode

Image
In Windows 7, using the "Safely Remove Hardware" or "Remove Media" from the System Tray icon (on the lower right corner of your screen) does not eject the Kindle Keyboard properly to exit the USB Drive Mode to enter the power charging mode. Instead of using the System Tray icon, go to the Windows Explorer. Located the Kindle itself under "Computer", right click on it and choose "Eject". Update: 12 December 2011: Change "Kindle 3" to "Kindle Keyboard".